Photo by Jakob Owens on Unsplash
Happy holiday season! There are so many great decorations for us pet lovers for sale, but if you have some extra time and are feeling the holiday spirit, why not try to make some of your own? Check out these 5 ideas for DIY holiday decorations.
1. Salt Dough Paw Print
Materials:
- 1 cup flour
- 1/2 cup salt
- 1/2 cup water
- A glass or circular cookie cutter
- A knife
- Rolling pin
- Baking sheet
- Wax paper
- Ribbon
Instructions:
- Preheat the oven to 200 degrees.
- Combine the flour, salt, and water in a bowl and knead with your hands until the dough is smooth.
- Lay the dough out on a floured surface (so it doesn’t stick to the surface) and use the rolling pin to roll it out to about 1/2 inch thick.
- Use the glass or the cookie cutter to cut circles into your dough (you’ll probably get about 4-5 depending on the size you make them). You can also use shaped cookie cutters like hearts or dog bones for a more unique design!
- Place the shapes on a baking sheet lined with wax paper (if they’re already on the baking sheet they won’t tear when you try to move them).
- Press your pet’s paw firmly but gently into the shaped dough. Press down on each part of their paw to get the best design.
- Poke a small hole with the knife in the top of the ornament for the ribbon to go through.
- Bake for 2 hours.
- Once they have cooled, you can paint them or write your pet’s name and date on them (with Sharpie) if you’d like. When you’ve finished decorating them, tie the ribbon around the top and they’re ready to hang!
Check out this video for a step by step tutorial:
For a faster option, you can also use air-dry clay (from your local craft store). Just mold the clay into a disc shape, press your pet’s paw firmly but gently into the disc, and then let it dry. Be sure to poke a hole through the top for the string before it dries.
2. Dog Bone Christmas Wreath
Materials:
- Wire wreath support or a handmade equivalent (sturdy cardboard cut out in a ring would work well)
- Dog bone shaped treats
- Ribbon in 2 colors
- Scissors
- Adhesive tape
Instructions:
- You’ll likely want to wrap the wreath form (or cardboard ring) completely in ribbon first. This gives it a more finished look from all sides.
- To do so, secure one end of the ribbon of the first color to the wreath form with tape. (You can also use hot glue or stitch it on if you’d prefer)
- Loop the ribbon several times for security, then using an overlapping diagonal pattern, wrap the ribbon entirely around the form until the wreath is completely covered. Loop around the starting/ending point several times again for added security.
- Leave some extra ribbon at the end to use as a loop for hanging or a decorative bow if you’d like.
- Using the ribbon of the second color, tape and loop one end of the ribbon just to the side of the that top point (starting/ending point of the first ribbon) to secure it.
- Work your way around half of the wreath in a diagonal pattern, wrapping a bone treat in front of each loop. Make sure there’s enough tension on the bone loop to keep the bones secured.
- Once you’ve gone halfway, loop the ribbon several times and secure with tape. (This is the bottom of your wreath)
- Repeat the bone loops from the top again on the other side, going in the opposite direction. Secure the ribbon at the bottom again.
- Add any additional bows or decorations you’d like and then hang your wreath!
Make sure you hang your wreath somewhere out of reach of your pup until you’re ready to share the goodies! When you’re ready, the wreath easily comes apart to share those tasty treats with your pup.
3. Pet Photo Ornament
Materials:
- Wood slices or coasters – leftover from cutting down your Christmas tree or from the local craft store (make sure they are unfinished)
- Printed photo of your pet or you and your pet
- Mod Podge and brush (any foam brush or paint brush will work)
- A drill
- Ribbon
Instructions:
- Trace the wood slice on the back of your photo and cut along the traced lines. Line up the photo on the wood slice and trim any excess.
- Dab a small amount of Mod Podge on the center of the wood slice and press the photo down to stick it to the wood. Allow to dry for 1-2 minutes.
- Brush a layer of Mod Podge over the entire front side of the ornament and the photo. Allow to dry completely.
- Drill a hole at the top of the ornament and thread your ribbon through, tying a knot at the top.
4. Doggy or Kitty Advent Calendar (for Christmas or Hanukkah)
Materials:
- Cork board (typically a 14×14 inch board works well)
- Thumb tacks
- 24 miniature stockings or little festive baggies
- White or black puff paint
- Ribbon
- Doggie or kitty treats (you can purchase these or bake your own!)
Instructions:
- Optional: Line the edges of your cork board with ribbon or painted decorations for added pizzazz.
- Using the puff paint (of whatever color or colors you prefer), number the stockings/baggies with 1 through 24.
- Fill each stocking/baggie with your pet’s preferred treat.
- Line up the stockings/baggies in rows (likely it will be 6 in each row with 4 rows).
- Using the thumb tacks, tack each baggie onto the cork board.
Add your own pet themed decorations to the cork board to make a personalized and unique advent calendar. This DIYer handcrafted little burlap bags with felt stockings and added a her own cute wooden puppy to the advent calendar to make it extra adorable!
You can adjust the advent calendar from 24 slots to 8 slots to celebrate Hanukkah with your pet instead. There are plenty of Hanukkah themed pet gifts out there, from catnip dreidels to menorah bandanas. Or you can make your own kosher pet treats to gift to your pets.
5. Paw Print Christmas Tree Painting
Materials:
- Crayola washable paint (non-toxic and easy to clean up)
- Paper/cardstock – the size will depend on the size of your pet’s feet but for cats or small dogs a 5×7 sheet should work, for larger dogs you may need an 8×10 sheet
- Paint brush
- Picture frame (optional)
- Newspaper or old bed sheet (for placing under your crafting area, in case your pet walks around with paint on their toebeans)
- Wet washcloth (for wiping off your pet’s paw when you’re finished)
Instructions:
- Put down the sheet or newspaper to protect your floors from paint splatters.
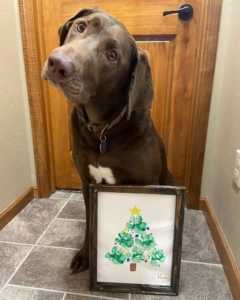
- Paint your pet’s paw with the green washable paint and place 3 paw prints along the bottom of the paper, then put 2 more above that, and one at the top to make a triangle of paw prints. (You may need to add more paint to your pet’s paw in between some of the prints.)
- Carefully wipe off your pet’s paw before they track paint out of the craft area.
- Once the green prints have dried, use the other colored paints to add a trunk, a star, ornaments, a garland, or whatever else you’d like to decorate your “paw tree.”
- Frame the painting and place or hang it to be admired!

